
StART YOUR HIGH SPEED INTERNET NOW!
Setup Instructions
The first step to high speed fiber optic internet is to come down to our office and sign up for the plan you need. Our friendly customer service representatives will help you decide which plan meets your needs.
After choosing a plan, you will then either be given an installation appointment, or, if our internet has been previously installed in your residence and you feel comfortable doing it, you will be given equipment to hook up yourself when you get home. If you have an appointment, you are done. One of our install crews will come at the appointed time and hook everything up; if you are doing it yourself, keep reading for further instructions.
Below are some more specific instructions for how to set everything up yourself. If at any time you don’t feel comfortable doing the setup yourself, feel free to give us a call at (660) 886-6966 ext 1199 and one of our techs would be glad to help you.
Lets Get Started!
The first picture below shows the equipment you will be given before leaving our office. It could vary a little but will be very similar. For example, the blue cable could be yellow and the black media converter could have green tape on it rather than orange.
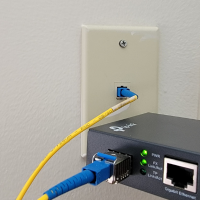
The second picture shows a media converter plugged into the wall plate that would be located inside your house. If you can’t locate this wall plate, go outside and walk around your house looking for a box similar to the one in the third picture. It may not be exact, but it will have the black cable coming out of the bottom. The wall plate should be located directly on the inside of the house from that box.
If the other wall on the inside from that box is in a crawl space or an unfinished basement, you should see the thin blue or yellow fiber optic cable that comes inside from the box. Follow this cable along the ceiling until you see it go through to the upstairs. Upstairs, you should see something similar to the fourth picture.


Connecting the Router
Next, you need to connect your router to the media converter. All Brands and Models of router are different, but they will all basically be hooked up like the router shown in the picture. Notice the blue ethernet cable connecting the media converter to the router. On the media converter, there is only one port that it can connect to. On the router, it will fit in 5 places, but connect it to the one that is a different color than the others. Again, this varies depending on the router, but there will always be one marked with a different color or it will be explained in the directions that came with the router. Also, the blue ethernet cable could be any color.
Now make sure everything is plugged into power outlets and you are ready for the final step!
Almost Done!
The final step is to do the setup routine for your particular router. All brands are different, so you will need to follow the instructions that came with your router to complete this step. It may have you download an app for your phone or simply enter the username and password provided by them. Once this step is completed, you can connect all of your devices using the password provided or a new one you made during setup. Again, if you have any trouble during the process, feel free to give us a call and one of our techs can assist you